Install the MMC directly in the workshop and manage them as part of the production...
Section carried out with the technical advice of Hexagon Metrology, S.A.15/01/2006
The use of coordinate measurement machines (MMC) in the halls of quality control is increasingly common as a less satisfactory solution to achieve a quick and effective return of the information on the process. The possibility of installing the MMC directly in the workshop and run as a feature most of the activity of production allows the process under control at all times and therefore intervene instantly if there are abnormalities of quality. In addition, this reactivity reduces in great measure the time of development of the line which helps to reduce the time needed to launch a new product on the market. Gradually, the MMC has been bolstering is and have replaced the traditional dedicated gauges, for now have no rival in quickly to take data, but they are limited by the ability to perform only measurements related, is confronting a piece displays, and the total lack of flexibility.
The adoption of "flexible measurement workshop" make evolve the strategy of control of dimensional quality of the company.

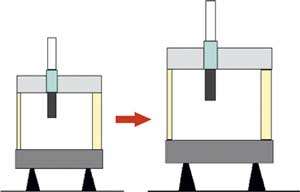
Figure 1. Linear dimensional variations
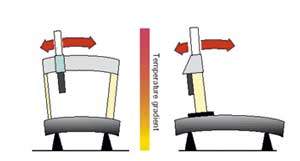
Figure 2. Dimensional variations
non-linear
The philosophy of control traditional "adjusting by failure" (correction of the process after detecting an anomaly) can be replaced by a more appropriate concept "mastered adjusting" (real-time control of the failures of the process to prevent the production of defective parts and get the key information to optimize the process). The main technical features that will have to ask the user to an MMC in order to meet effectively and efficiently the dimensional control workshop applications requirements are:
Great dynamism, to ensure a high frequency of control parts.
Sufficient accuracy to comply with the tolerances of the project.
Ease of use, so the system can be used by users without that there are consequences metrological.
Simplicity of loading and unloading operations, and when it is necessary to be able to join the productive flow.
Possibility to generate the measurement programme outside the line.
Appropriate protections, both of the machine concerning the environment and in terms of operator safety.
In order to satisfy those requirements, measurement of workshop machines are designed with technological solutions individuals that make them very resistant to the external environment.
Temperature of the environment
The temperature of the environment and the thermal gradients, are the most important factors for maintaining the goals of accuracy of a MMC. International standards considered correct dimensions of the physical body at the temperature of 20 ° C, but the thermal conditions in a production environment are varied and depend on the thermal gradients in time and space. However, you can see a gradual improvement of the environmental conditions in the workshop, there is the tendency to reduce the extreme temperature points, although even live production with temperatures environments mean variables between 18 ° C and 35 ° C and 10ºc gradients / 24 h.
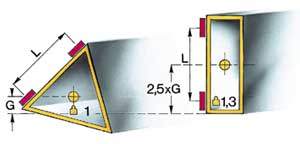
Figure 3. Comparison between the traditional and technology Tricision
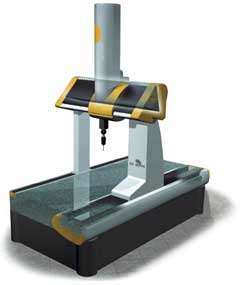
Figure 4. GLOBAL technology ACTIV measurement machine
Influence of temperature on the MMC
Almost all materials expand when the temperature increases. The materials of high thermal conductivity, such as aluminum, tend to standardize quickly own temperature and that of the external environment with what are very sensitive to thermal gradients, although they quickly recover a State of thermal equilibrium. Materials of low thermal conductivity, such as granite, are slowly thermal variations of the atmosphere which makes them less sensitive to rapid thermal gradients, although they take longer to reach a State of térmico-dimensional transition. In both cases, to obtain the correct measuring results when there are gradients, it is essential to resort to techniques of compensation in order to obtain the results of the measurements in terms of cooling. It also has to take into account the influence of the temperature for the workpiece measured; to simplify the issue we separate the problems relating to the machine for measurement of which relate to the piece. These last will try them in another article. The fact that the average temperature of the atmosphere is very different that international regulations considered cooling (20 ° C) and the calibration of the machine, in principle should not be a problem. In terms of thermal stability, it is possible to predict the behavior of MMC and make up for it. The majority of MMC are designed to ensure that their components can dilate (fig 1) linearly so machines can be compensated by means of linear compensation techniques that automatically carry all measurements at the temperature of 20ºc. However, the speed with which produced thermal variations (temporary gradients) and the stratification of the temperature in the area (spatial gradients) tend to create distributions of temperature in the MMC that they are not uniform and as a result creates distortions in their components (fig.2)which are generally more difficult to compensate. So the user can assess and confront properly the benefits of a MMC, norms, such as ISO, impose always producers the description of the temperature gradients hourly, daily and volumetric (absolute) which guarantee the precision of the machine.
Solutions and technologies
Materials and structureOver the years, the producers of CMMS have developed two schools of thought based on the choice of materials and techniques of compensation. Thus, there are in the market both machines measurement made with materials of low thermal conductivity, which favors the stability in the short term and transistors in a medium to long term, slow machines with a high thermal conductivity materials, with fast transistors that enable rapidly reach thermal equilibrium conditions. In general, the best choice is which is based on structures most symmetric possible, combined with technical solutions that make a reliable representation of the geométrico-estructural model of the machine and, therefore, the model of compensation. The rigidity of the structure is a very important feature that is available if you create the appropriate design. For example, a triangular section of the transverse carriage of the machine (technology Tricision and Slant) allows to obtain a better relationship stiffness/mass for a rectangular section. As you can see on fig.3. With sliding guides arranged at the same distance, the center of gravity is lower triangular section, which gives greater rigidity and stability to the machine. However, whatever the system of compensation used with today's technologies is not possible to obtain the same level of precision and reliability that the measure in a controlled environment in the workshop.
Structural thermal compensation
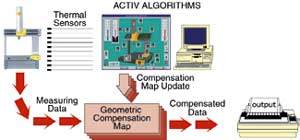
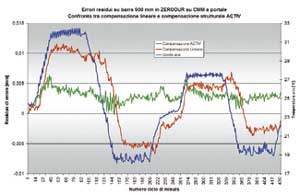
Linear thermal compensation techniques, as we have seen, can only partially offset the thermal effects workshop environment exerts on the measuring machine. That is why Hexagon Metrology uses advanced systems that are based on structural thermal compensation to be able to compensate for errors generated by the distortions in the structure of the machine caused by thermal gradients. A.C.T.I.V. (Adaptive Compensation of temperature Induced Variations) technology is based on the one hand in choice of design and materials of the MMC and on the other in shots made with thermal probes, arranged in the critical points of the machine, fig. 4. Advanced calculation algorithms determine the values of dilation and distortion of the structure and are used to correct real-time measurement data that have been taken of the piece, fig. 5. For this system of compensation to be effective, the MMC must have high dimensional stability. In this case, a high thermal conductivity materials that allow to quickly reach thermal equilibrium States, have been used and when possible homogeneous, to minimize the distortions. With this solution, the measuring machine and the parts are usually at the same temperature, i.e., at room temperature. The data obtained from an MMC mobile bridge reflected in the diagram fig. confirm the effectiveness of the technology A.C.T.I.V. in reducing the uncertainty of measurement in the presence of large thermal variations (15 to 30 ° c with a gradient of 10 ° C / 24 h). "Climate" is available for more controlled environments, where the thermal variations are in the field of 16 - 26 ° C with a maximum gradient of 5 ° C / 24 h.

Figure 5. Functional scheme of the ACTIV technology
Figure 6. Resulting graph of the ACTIV compensation
Cells and cabins
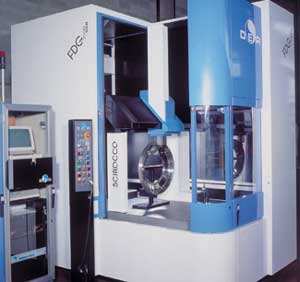
In other cases, the MMC are installed in cells ventilated or conditional (fig. 7) that minimize the effects of the temperature and the thermal gradients and maintain a constant humidity level. In addition, cells protect the machine of the dust and the lubricating environment. Normally cells are only measuring machine; Sometimes the cabins are adapted to host, in addition to the machine, a job for the operator. Thus guarantees the functioning of the machine in conditions of total security. Ventilated cells are intended to bring the structure of the machine at the temperature of the external environment with slower thermal gradients and avoid the stratifications of temperature in the volume of the machine. Obviously the thermal effects are minimized but not removed and therefore to avoid machine metrological performance degrade uncontrolled way, it is essential to apply in the MMC best clearing systems. Conditional cells maintain the MMC to an optimum and constant working temperature, which allows to work at the machine in terms of thermal stability. He has been observed that with this solution, the cycle of data collection is carried out at a different temperature of the piece that is measured.

Figure 7. DEA FDG2000 measuring cell
Related Companies or Entities
Hexagon Manufacturing Intelligence
