Metrology, a constantly evolving technology
Take as an example the optical measurement technology in the automotive sector. Pico Europe, a group company Comau Pico (owned by Fiat), is the largest provider of global production for automotive systems. They design, manufacture, install and put into service car production lines for manufacturers such as Ford, Jaguar, Scania and Volvo.
This means to assemble each an of the tools that make up the production line, bringing together the bases, units, support and centradores already machined fixtures in their dimensional correct settings that reflect the design of each car. Once finished this operation, try the complete assembly line, then transported piece by piece to the customer, where it becomes to mount, is the final check and is put into service.
Since 1996, peak Europe relies on the Leica Geosystems Laser Tracker System (see box) as a guarantee of a fast production through assembly line, combined with a great precision in the measurement of each point. However, the interesting thing is how arranged themselves them before...
Leica Laser Tracker: How to do it well and do it right the first...
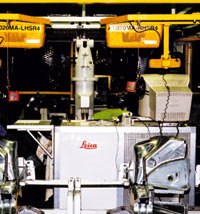
Before the Laser Tracker - measurements with a piano wire
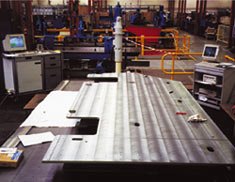
Smaller fixtures could certify fully assembled, with all its units, centradores and support on the basis of the equipment. But if the tool was too big for her cover the MMC, it was necessary to measure the base in two stages. One side was first measured, and then rotated 180 degrees to measure the other. Then moved the bases to another part of the workshop, where began the Assembly of the cutter.
The disadvantages of this method are obvious: it is extremely difficult to keep together the two parts with a certain degree of accuracy. Another problem that arose when moving a large plate of steel is that it can vary from form during transport because of its own weight. This means that the base should be levelled again, with an optical level, before starting the final assembly of the useful.
The measurement procedure, once assembled the equipment, also was rudimentary, not to mention the time required for carrying it out. Often had to move a unit set previously to make physical space to place another block. (The process was still more complicated if the basis of the tool had to be placed at an angle of 45 °.)
Then, put each of the Assembly in its working position utensils. They then returned to measure the tools to check that the dimensional integrity during transport had not been lost. And it was often still more difficult to measure the useful within own line. Something that is hardly surprising if you consider that between the measurement tools that were used had elements as advanced as strings of piano (the line-up), micrometers of rod (for the spacing of the useful) and optical levels (to level the whole line).
The final phase of the operation, i.e., move all assembly line to the plant of the client for installation and put into operation, raised even more problems with the inflection of the tools. To complicate matters, once in the factory there was no way to verify or to certify the tools again. And what is worse, if a unit is damaged during transport, it was very difficult to replace it in situ, because the only way to certify the unit was using conventional methods.
Finally, although by no means least important, often arose conflict because the panels of the client did not conform exactly to the tooling of peak Europe. These situations were also extremely difficult to resolve, in the absence of a reliable means to measure the useful and to verify whether it conformed to the design of the client. Not to mention the time and money wasted...
Technology changes the picture
If you have sufficient useful space, databases can be placed directly in its relative position within the Assembly line. Fixing level references in each of the ends of the production line, which allows the Laser Tracker to generate highly accurate coordinate system tied to the severity.
Then, all the bases of the line can be level, and coplanarlas each other. Ironically, piano strings are still used occasionally to make a first alignment of the bases. However, the final alignment and spacing is carried out using a Laser Tracker, with a radius of up to 40 meters. The Leica System is also used to check and adjust the flatness of the basis of the useful (by means of adjustable support screws), and to verify the position of the holes for Assembly and subject.
It is time to start the installation; the first units, then the supports and the centradores. On completion of the process, the tool will be ready for certification. All the components that form a mechanism are machined, and your Assembly configuration must be almost nominal. Then the Laser Tracker is used to measure the geometry of the workpiece.
Attention... deer!
Steinbrecher, responsible for the purchase of equipment of measurement and training at Itez Central, smiles remembering: "Looked like a kind of giant deer antlers". "Workers used to say: here comes the deer!"
It is hard to believe today, but "the stag" was active in Rüsselsheim until well into the 1980s. Probably it happened like that with those typewriters that they were used then, that today they seem so outdated...
Leica in Spain
Spain Leica has provided more than fifty Laser Trackers to sectors such as automotive, aerospace and as well as other industrial sectors. Among its customers are from small workshops to large companies, among which we highlight:
- Serra welding
- TMS AritexCading
- ASM
- Mercedes
- IVECO
- Airbus
- EADS-CASA
- Gamesa
- M-Torres
- IZAR.


