Ultrasonic machining revolving technical ceramics: study of the process
The good characteristics in service of technical ceramics due to its high hardness, high wear and abrasion resistance even at high temperatures and to its low density, are entering the market with new and more advanced applications, which makes more evident the need to optimize their manufacturing costs. Current costs through conventional processes such as grinding range usually between 30-60%, in some cases reaching 90% of the total cost of production.
Non-conventional machining processes that are being developed for the machining of these ceramics among the machining by ultrasounds revolving (RUM-Rotary Ultrasonic Machining) for being an efficient and economically viable process for machining of hard materials and fragile [2].
The RUM is a process that consists in the Elimination of material using a tool of superabrasivo through a combination of three movements: rotation, axial ultrasonic vibration (frequency of the order of 20 Khz.) and advance against the piece. On the other hand, a stream of taladrina is pumped through the tool by removing the chips from the cutting area, avoiding the dullness and cooling process.
With regard to the mechanism of starting material, the RUM is a hybrid process that combines the mechanisms of traditional with diamond grinding and machining boot (USM), improving both processes [3] by ultrasound. Following is a list the advantages of the RUM with both technologies:
Compared to traditional machining by ultrasounds (USM), the benefits that stand out could be summarized in the following respects [2, 3, 4]:
- It is 10 times faster.
- It is easier to drill small holes and their accuracy improves.
- There is less pressure on the tool and lower rate of wear.
- It is not necessary to use abrasive fluid.
Compared with the grinding, the advantages are as follows [5, 6]:
- Produces lower court forces (65%-70%) and tool wear.
- It improves the surface roughness (29%).
- There is no heat-affected zone, or chemical alterations in the surface of the piece.
- Creates a layer of residual compression stress which could increase the machining component fatigue life.
Grinding produces very hot and is not suitable for the machining of small geometries or to produce live edges without damage on the surface. In this sense, RUM technology emerges as a solution efficient, capable of producing up 0.5mm without surface damage just diameters.
This work is a study of the behavior of the RUM technology in machining of technical ceramics: aluminium oxide. For this purpose, two machining operations have been analysed: milling and drilling, both in terms of finish, using the method of design of experiments to assess the principles and real advantages of this technology to the grinding.
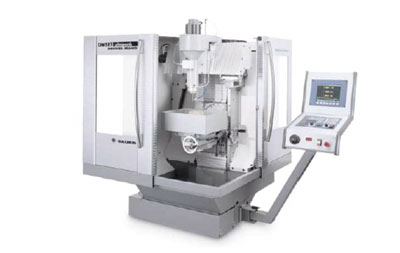
The trials were done on a machine of RUM of the mark Sauer Ultrasonic (DMG) model 35 DMS, see Figure 1, which includes an ultrasonic generator and an ultrasonic head. It also includes 2 control algorithms that govern the progress according to the value of the torque control (ADR), and the value of an acoustic signal that relates to the axial effort that takes place in the process (control ACC). These systems monitor the process to protect the integrity of both the tool and the workpiece.
The trials were carried out by modifying various parameters of cutting and measuring forces Court, roughness and roundness (in the case of the drilling), and maintaining constant vibration conditions during the same.
The measurement of the results was made using the following equipment:
- Shear forces are captured by means of a torque-indicating Allen Kistler model 9257-BA brand platform.
- Surface roughness was measured with a roughness of the model SJ201P Mitutoyo brand. Measurements were conducted in the direction of progress of the tool in every machining operation.
- The roundness is measured using a machine of measure for coordinates of the Zeiss model UPMC brand 850 CARAT at 3 levels of each hole.
Cutting conditions used in the trials are the ones shown in the table 1 and table 2. It has used a method of design of experiments and the results have been analyzed using the method of analysis of variance ANOVA.
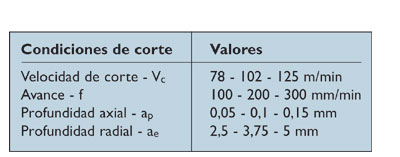
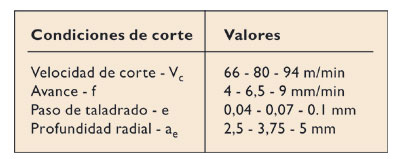
Output variables were the 3 components of the forces of court and the roughness in the case of the milling, the axial component of the cutting force, roughness and roundness to be for the drilling.
Both the testing of drilling as the of milling were conducted with and without the assistance of ultrasound, to compare the behavior of the process of RUM from a similar to the grinding operation.
Trials of milling
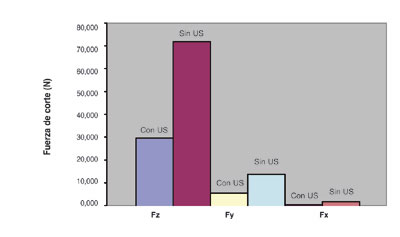
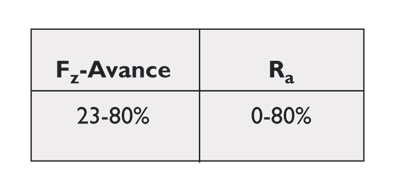
The results of the tests indicate a clear reduction of shear forces and roughness obtained in the process with vibration to the process without ultrasonic vibration. Achieved reduction intervals are shown in table 3.

Reduction of shear forces occurs due to the action of ultrasonic vibration and is also associated with the fact that the generated shavings are lower due to a better fracture of the material under the effect of ultrasonic vibration [7].
The roughness measures confirm thing pointed in previous studies [8], noting with RUM a reduction of the same, in this case reaching 21 per cent, as indicated in table 3.
As regards the testing of drilling, the results indicate a clear reduction in both the axial cutting force and roughness obtained in the process with vibration to the process without ultrasonic vibration. Achieved reduction intervals are shown in table 4.
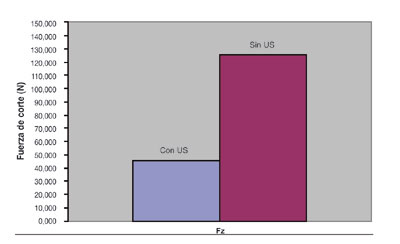
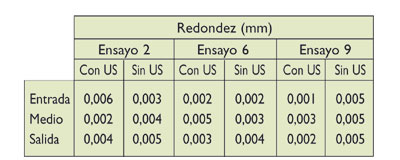
The quality of obtained with the machining holes
As you can see, with the exception of some of the measures as trial 2 entry and the flat central of the test 6, all levels have a better roundness with ultrasound.
Size of chips
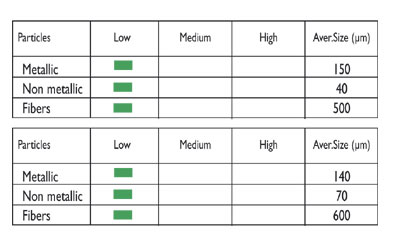
Samples of the fluid of Court were then analyzed by filtrografía to know the size of these particles were collected during experimental trials. This essay provides information about metallic particles from the wear of the tool, fibers of the remains of the filter of the fluid of court, and non-metallic particles corresponding to ceramic chips of the machined material. In Figure 4 you can see that the value corresponding to the size of the non-metallic particles in the case of machining with ultrasonic fortieth m against the 70 ° m without Ultrasonic machining, which involves a reduction in size of 57%.
Test piece
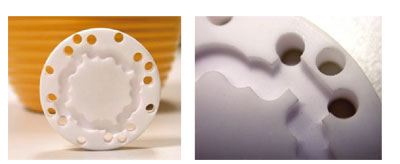
In order to check the advantages and benefits of the technology of machining by ultrasounds revolving a Royal piece is mecanizó, this piece of test corresponds to a ring of adjustment, see Figure 5. The machining of this component includes operations of drilling and milling, and the time spent for his production on the basis of a disk of material was 1 hour and 10 minutes, being the roughness average less than 1 µm Ra.
Conclusions
As conclusions the following advantages and benefits of the technology of Rotary Ultrasonic machining can be:
- There is a clear reduction of shear forces due to ultrasonic vibration for the operations of milling and drilling. This reduction of efforts of court avoiding the creation of defects at the edges of the components during machining.
- There is also a roughness of up to 20% improvement in operations of 80% in the drilling and milling. These results confirm the benefits of this technology and its applicability to finish machining.
- The results that show the steps of roundness are positive that the process with ultrasound produces a better quality in the drills.
- Finally, a test piece is mecanizó using the two operations studied, milling and drilling, confirming the potential of this process as a substitute for grinding for the realization of complex components in hard and fragile materials.
Thanks
The authors wish to thank the Department of industry of the Vasco-Eusko Jaurlaritza Government assistance received for carrying out this work in the CIC MARGUNE project of the ETORTEK program.
References
[1] E.Uhlmann, G.Spur. "Surface Formation in creep feed grinding of advanced ceramics with and without Ultrasonic Assistance". Annals of the circumcision information resource center, 1998.
[2] Z.J.Pei, D.Prabhakar, P.M.Ferreira. "rotary ultrasonic drilling and milling of ceramics". The Design for Manufacturability and Manufacture of Ceramic Components Symposium.
[3] D. Prabhakar, Z.J. Pei, P.M. Ferreira, M. Haselkorn, "A theoretical model for predicting material removal rates in rotary ultrasonic machining of ceramics", Transactions of the North American Manufacturing Research Institution of SME 21 (1993) 167-172.
[4] P.G.Petrukha et al., "Ultrasonic diamond drilling of deep holes in brittle materials", Journal of Russian Engineering 50 (10) (1970) 70-74.
[5] D.V.Cleave. "Ultrasonics gets bigger jobs in machining and welding". Iron Age 218 (11) (1976) 69-72.
[6] K.F.Graff, "Ultrasonic machining", Ultrasonics 1975: 103-109.
[7] Vicar I, Gonzalo or, Abasolo u. "Rotary Ultrasonic Machining of Aluminum Oxide ceramics: designed experiments". Fifth International Conference-High speed machining 2006, Metz (France).
[8] Y.B. Wu, M. Nomura, Z.J. Feng and M. Kato. "Modeling of Grinding Force in Constant-depth-of-cut Ultrasonically Assisted Grinding". Material Science Forum vols. 471-472 (2004) pp.101-106. n
